Open topic with navigation
Activities
Activities define the operations that can be scheduled within the mine and are spatially represented by Activity Areas that are 'mined' by Resources (equipment). Examples include drilling, blasting, exclusion zone and mining. An unlimited number of Activities can be defined to model any scheduled activity.
A number of system-defined activities are pre-defined with restricted configuration options;
Mined-Out - An Activity that denotes that all material has been mined from an activity area. Drawing Mined-Out areas in the Client is a way to make adjustments to face positions, see Mined out areas.
Rehandle Operations - Set the colour and quantity field for rehandle operations. Resources can be assigned to Rehandle Groups in order to schedule rehandle operations. If a Resource is enabled for the Rehandle Operations Activity then the Resource Production Rate will use the Quantity Field defined here.
Activity configuration
- Click the Activities icon.

- Click Add
 to add a new activity area.
- Enter a Name in the Activity Definition panel.
- From the drop-down lists, select a Display colour and Quantity Field.
The Quantity Field value will be aggregated as per its aggregation type for all blocks in an activity area. The aggregated quantity is 'mined' by a Resource that is associated with the activity. The length of a task in the Gantt chart is determined by the time taken for the associated Resources to mine the Quantity Field value at the Resources respective production rate.
- Adjust the Number of Slices from the default value of 10.
Activity areas are cut into equal width slices perpendicular to the mining direction. The slices are used in the Reserving process, and the number should be set to match the block model resolution and the size of the activity area. As a slice is mined, it releases the activity area slices below it to be mined. The release of slices only applies to activities that move material. Activities that do not move material will release the block below when all slices are processed.
- Enter the Maximum Resources (maximum number of equipment to be associated with this activity) and select a Display Legend to be used when viewing blocks within this activity type.
If <No Legend> is selected, blocks will NOT render for the activity areas.
-
Select a display Legend [Optional], see Legends.
- Select whether the activity area Moves Material. An activity that moves material will be mined out in the schedule animations.
- The Requires Haulage option can be enabled if the activity moves material. When enabled, haul connection roads will be created from the haul route to the activity area centroid.
- If Selectable is disabled, the activity will NOT be selectable in the 3D Scene (and hence not editable).
- If Editable is disabled the activity will NOT allow any edits to the activity area shape.
- By default, the Calculation Mode is set to On Change so that reserves are automatically calculated. On Demand calculation enables activity areas to be calculated when manually triggered (re-evaluate or re-create). Changing the calculation mode will only apply the settings to new activity areas. To change the mode of existing activity areas use the Activity Area grid context menu in XECUTE.
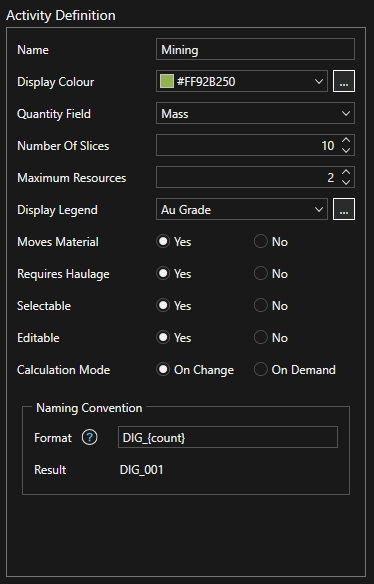
- Apply a Naming Convention.
Naming conventions define the next automatic name that the system will assign to a new activity area.
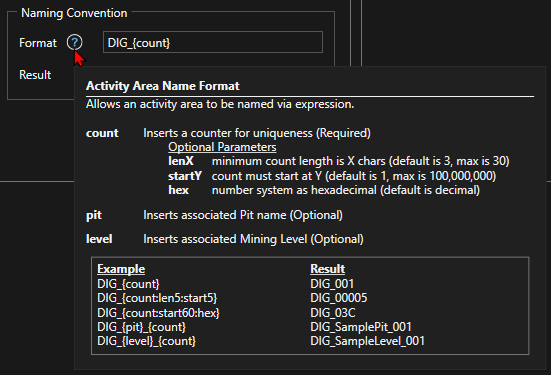
Naming conventions are applied globally, which means that different activity areas that have coincident naming conventions will never produce two activity areas with the same name.
Different Examples:
- DIG {count} : DIG 001
- DIG {count:len4} : DIG 0001
- DIG {count:start2} : DIG 002
- DIG {count:len4:start2} : DIG 0002
- DIG {count} TEMP : DIG 001 TEMP
- DIG {count:start10:hex} : DIG 00A
- DIG {count:hex:start15} : DIG 00F
Rules
- Naming convention always needs to include "count" between at least one of the brackets, and must occupy the first position.
- The rest of the parameters (len, start and hex) can be placed in any order within the brackets, but can only appear once.
- If hex is not added, the default number system is decimal.
- Any string can be appended or added to the naming convention.
- (Optional) Add an entry for each In situ to Scheduled material transformation.
In situ to Scheduled allows a material type to be converted from one type to another as part of the reserving process. The values used for scheduling and passed on to subsequent nodes in the material flow are based on the resulting "Scheduled" materials.
In addition, you can choose whether to include the effect of the in situ qualities of the in situ material in the calculation of the overall qualities of the Scheduled material. This would be done to include the dilutive effect on qualities of inseparable parting in an ore pass.
Dependencies
If the activity type depends on other activities enable the dependencies by ticking their check box. An activity can have zero, one or multiple dependencies.
Activity - The activity the current activity type is dependent upon.
Method - Whole or Slice offset. Whole means the entire activity must be mined before the current activity can start mining. Slice Offset is the number of slices that must be mined before the current activity can start mining.
Offset - If Slice Offset method is selected then set the number of slices to offset by
Overlap Tolerance - In project area units and is the area of overlap permitted between the current activity and the dependent activity that will NOT trigger the dependency. This setting is useful to prevent small overlaps holding up mining sequence.
Bench to Bench Overlap Tolerance - This tolerance allows blocks between adjacent mining levels to overlap in plan view up to the specified value (m2) without triggering a dependency. Grade control blocks converted to activity areas could sometimes overlap by minute distances and this could hold up the mining sequence. If the tolerance is not specified, any overlap in plan view between areas on adjacent mining levels will generate a dependency.
In Situ to scheduled
In certain configurations, it is possible to have material in an Activity Area reporting as, for example, Waste, when it should be Ore. This occurs when:
- A regular block model is used (where the surfaces of the blocks do not exactly coincide with the stratigraphic surface).
It is exacerbated in the case where centroid flagging of material types is used in the geological modelling process. In this case, the diagram below illustrates the issue. The blue (waste) and grey (ore) blocks represent blocks of different material types in section view. They have been centroid-flagged based on the stratigraphic surface shown as the red line. This surface is also used as a mining level in XECUTE.
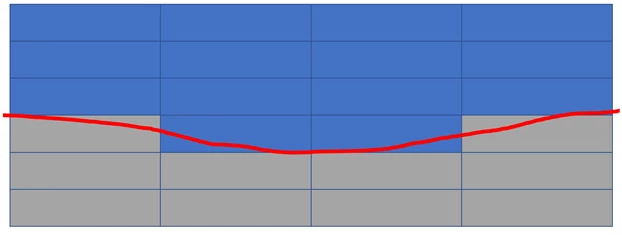
When an activity area is created in this area using the mining level shown by the red line, it is expected that the top pass is a waste pass including only waste. However, when this is reserved by XECUTE the edge of the ore blocks are picked up in the waste pass, resulting in a small amount of ore in that activity area.
In reality these small quantities would not be separable, and would be lost or diluted. This occurs because of the pairing of stratigraphic benches with a block model. When benches are designed, they follow geological contacts. Having benches follow these contacts results in a surface that 'clips corners' when it is evaluated against the block model.
While the example above is due to the vertical extents of the activity areas, this same issue does occur when you look at the lateral extent of the activity areas.
The Material Reallocation feature in XECUTE allows you to define rules for each activity type, so the 'edge blocks' are properly accounted for in the reserving process.
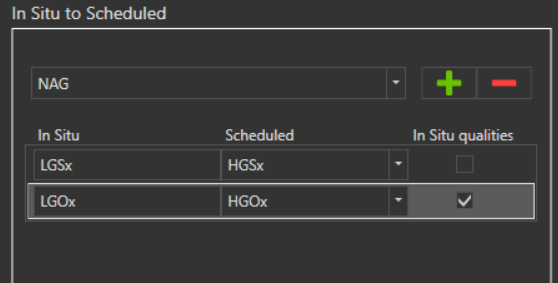
Material reallocation
In the example shown below for the selected Activity Area, in this case HG Mining, the configuration options chosen will combine the volume of the LGSx blocks with the volume of the HGSx blocks. The volume of the combined blocks will acquire the properties of the HGSx blocks. The process is as follows:
- Calculate the quantity and qualities of the in situ HGSx blocks using the proportional reserving logic.
- Add the volume of the in situ LGSx blocks to the total volume for HGSx.
Calculate resulting total mass, total volume, and so on of HGSx. Also in the example shown below for the selected Activity Area, the configuration options chosen will combine the volume and quantities of the LGOx and HGOx blocks and assign them to the HGOx material. The process is as follows:
- Calculate the quantity and qualities of the in situ HGOx block using the proportional reserving logic.
- Calculate the quantity and qualities of the in situ LGOx blocks using the proportional reserving logic.
- Combine the in situ LGOx quantities and qualities with the in situ HGOx quantities and qualities according to the aggregation types defined.
- Allocate the combined quantities and qualities to the HGOx material.
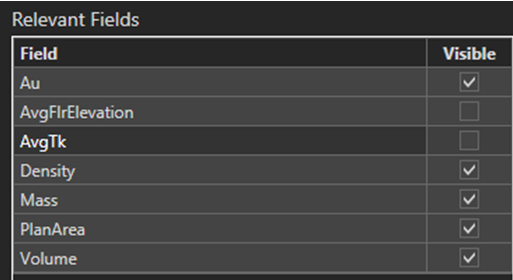
Relevant fields
Select relevant principal fields to accumulate for the activity. The selected relevant fields are visible in the Activity Areas tab and the 3D Scene Materials properties panel.
Click Save to save the newly created activity area, or click  to save the current item and create a new one.