XECUTE utilises mathematical algorithms to optimise the flow of material movements from the loading point in the pit to the end destination for each material and product. Product Optimiser (PO) is a complex equation and requires some fundamental understanding to configure the system. The following section focuses on configuring the rules and the effect of those rules.
PO rules are defined in Site Management > Objectives.
When configuring an XECUTE model, start with a simple configuration and build up to the final configuration. Each time a schedule is run, a range of mining rules, constraints, mining objectives, product rules and product transformations are typically applied. Starting simple, then adding additional rules once model behaviour is understood, will result in a better outcome.
PO utilises limits, penalties and filters to apply to the equation which determines the optimum material movements.
Soft limits are the optimum material limits that we want to obtain.
Hard limits allow materials to be considered within the period calculation that are not within the material requirement. Hard limits allow a material outside of specification to be used provided the blend can still be achieved across a period.
Filters prevent any material with specifications outside these limits to be used in the evaluation of a material movement. Filter rules have been introduced to make it easier to control specific material movements, in addition to the average quality per period.
The objectives provide limits used by the PO to blend and deliver material to where it needs to be, at the desired quality specification.
An Objective can be based on one or more numeric Quality fields (Weight Average aggregation type), Quantity fields (Sum aggregation type) or based on an Expression.
.  to create a new objective. button becomes active. icon to display the objective rule graphic control to set upper and lower limits for the selected Principal Field. (see Quality and quantity objectives below)
To reset overridden values to configured values, right-click in a cell to open the context menu and click Reset Selected to Default.
To apply the overrides, click the Apply button in the lower right of the override window, then back in the Objectives window click the Save icon.
Expression-based objectives allow you to set the objective parameters using expressions based on principal fields, Math and String operators and functions. A numeric value must be returned from the expression.
To create an expression objective:
to open the expression setup dialog.
Click Apply to add the objective definition
To edit an existing expression objective click the fx icon at the top of the objective definition
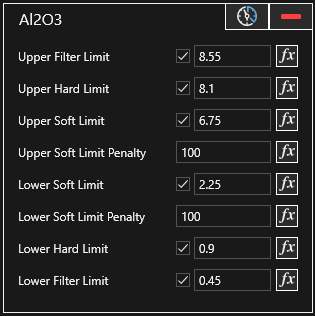
For quality and quantity objectives you define the objective limits in the control as shown below by entering values in the boxes at the end of the limit line. For soft limits, the associated penalty value (if the principal field value falls outside the limit) is set in the box to the right of the limit value. You can click and drag the limit lines to change the limit value.
To adjust the Y axis scale, enter values in the boxes to the left of the axis (shown below as 0 and 17).
To disable or apply a limit threshold, toggle the Limit icon to the left of the Y axis. Once disabled the limit line is removed from the control.
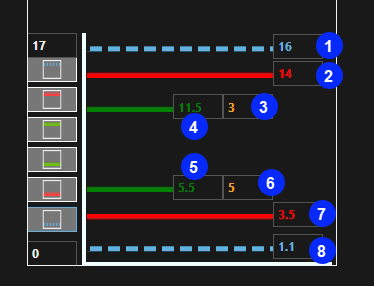
| Item | Description |
|---|---|
| 1 |
Upper Filter |
| 2 | Upper Hard Limit |
| 3 | Penalty Applied if over Target |
| 4 | Upper Soft Limit |
| 5 | Lower Soft Limit |
| 6 | Penalty Applied if under Target |
| 7 | Lower Hard Limit |
| 8 | Lower Filter |
For quantity type objectives (min, max, and sum type principal fields), filters are not applicable and the block model is scanned to provide an initial range of values. You can then adjust these limits as required.
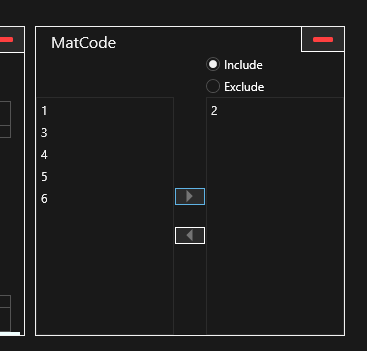
If the selected principal field has an aggregation type set to None, the objective is treated as a filter and will only allow material based on the Include or Exclude rule. In the image below, the MatCode field had unique values of 1 to 6 in the block model and these were listed in the left panel. The Include option was selected, and the code value 2 was moved to the right panel by clicking >. This applies a filter to only allow blocks with a MatCode value of 2 to satisfy the objective.
When Limit Expressions are used (Are Limits Expressions - Yes option) the objective configuration box shows a check box for each limit property (to enable it), a text field to show the limit value, and a fx button to create the limit expression. Expressions can also be directly entered into the text box.