Define operating hours
A roster defines how a resource (e.g. a piece of equipment) uses time throughout the week. It acts as an operational schedule, determining when the resource is available to perform scheduled tasks – and when it isn’t. Scheduled tasks can be performed during available operating time, while other types of tasks (like breaks) occur during non-operating time.
A resource can perform two types of tasks:
-
Productive: These are scheduled operations such as mining, drilling, or blasting. They occur during the resource’s available operating time.
-
Non-productive: These represent planned downtime—such as breaks, shift changes, maintenance, or weekends—and are defined using work categories and assigned via rosters.
In XECUTE, you can build rosters – allocating productive and non-productive time throughout the week. You assign a resource (e.g., piece of equipment) to a roster to determine its operational schedule.
You build a roster by allocating productive and non-productive hours across each day of the week. The roster breaks time into intervals (hourly, half-hourly, 15-minute, or 5-minute blocks). Non-productive hours grouped into user-defined work categories, such as Shift Change, Weekend, or Blast Delay. A roster repeats on a weekly cycle.
Open operating hours setup
Setting up operating hours primarily involves defining work categories and rosters.
-
Config > System Configuration > Work Categories
-
Config > System Configuration > Rosters
How to define a resource’s operating hours
To define a resource’s operating hours
-
Set up work categories.
-
Go to Config > System Management > Work Categories.
-
Create a work categories, defining types of non-productive time used in a roster.
-
-
Set up rosters.
-
Go to Config > System Management > Rosters.
-
Create a roster, and assign work categories to time intervals across each day of the week.
-
-
Assign a resource to a roster.
-
Go to Config > System Management > Resources.
-
Select a resource then, using the Roster property, select the required roster.
-
Work categories
A work category represents a type of task.
-
Productive tasks (i.e., digging or drilling an activity area) always fall under the system-defined Available work category.
-
Non-productive tasks are represented by other work categories, system-defined or user-defined.
There are two system-defined categories:
|
Default Category |
Type |
Description |
|---|---|---|
|
Available |
Productive |
Time when the resource is available to perform productive tasks (i.e., digging, drilling…). |
|
Maintenance |
Non-productive |
Time allocated for maintenance, during which the resource is unavailable. |
You can define additional non-productive work categories to represent other types of downtime, such as:
-
Shift changes
-
Refueling
-
Blast delays
-
Weather conditions
-
Breaks
Only non-productive categories can be user-defined. Productive time is always represented by the Available category.
Create work categories
You define a list of work categories in Config > System Management > Work Categories.
Use the options to add  , remove
  , and save
  work categories.
Properties
After you create a work category, you need to define its properties.
|
Work Category |
|
|
Name |
Defines the name of the work category. |
|
Display Colour |
Defines the colour of the work category as it appears as a task bar on the Gantt chart. |
|
Priority |
Determines which category is shown when multiple non-productive events overlap. Lower numbers = higher priority. |
Assign work categories
Each roster is made up of time intervals: blocks of time that represent either working or non-working periods. Every block is assigned a work category, which determines whether the resource can perform scheduled tasks during that time.
-
If the block is assigned to Available, the resource can perform productive tasks (e.g. mining, drilling).
-
If the block is assigned to any other work category (e.g. Break, Maintenance, Shift Change), the resource is unavailable during that time.
The table below shows how the first six hours of each day might be structured using half-hour intervals. Each cell represents a time block that can be assigned a work category.
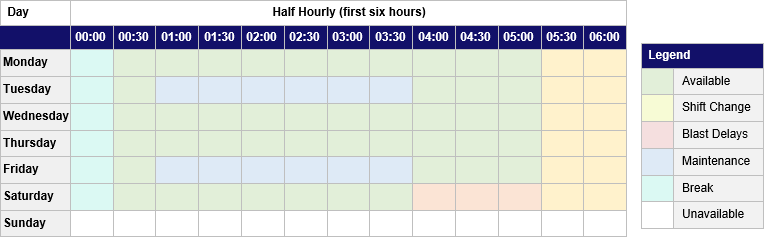
You can customise the operating time however you like. For example:
-
Assign Unavailable to weekends to restrict work to Monday–Friday.
-
Define a day shift from 08:00 to 17:00 by assigning Available only during those hours.
-
Insert Shift Change or Break blocks to reflect other operational pauses.
Process
To assign work categories
-
Choose a time interval to select the level of detail you want to work with (e.g., hourly, 15-minute, 5-minute).
-
Select a work category from the list of available categories (e.g., Available, Break, Maintenance).
-
Click or drag across time blocks I the roster to assign the selected category.
-
As needed, reassign blocks by selecting a different category and clicking again.
-
Save your changes.
You can use the ellipsis menu to quickly create new work categories . You can also use the Set All button to apply the selected category to all blocks in the roster.
Multiple rosters
You can define multiple rosters in XECUTE, each tailored to the operating pattern of a specific resource or group of equipment. This allows you to reflect differences in availability across your fleet.
For example:
-
One loader might be scheduled for regular maintenance every second day.
-
Another excavator might operate continuously except for a weekly shutdown.
-
A drill rig might have a custom schedule that includes extended breaks for refueling and calibration.
Each resource is assigned a roster that reflects its expected availability. This ensures the schedule accurately models equipment-level constraints and avoids overcommitting machinery.
Effect on scheduling
A resource’s roster directly determines its available operating hours. It can only perform scheduled tasks during time blocks assigned to the Available work category.
During Available intervals:
-
The resource can perform productive tasks (e.g. mining, drilling).
-
Tasks are scheduled in the order defined in the Gantt chart.
During non-productive intervals:
-
The resource is unavailable.
-
These intervals appear in the Gantt chart as non-productive tasks, labelled with the name of the assigned work category (e.g. Shift Change, Break).
This ensures that scheduled tasks are only executed during valid operating windows, and downtime is represented.
Example: roster impact on Gantt chart
In the example below, the resource is assigned a roster with Unavailable blocks during certain hours.
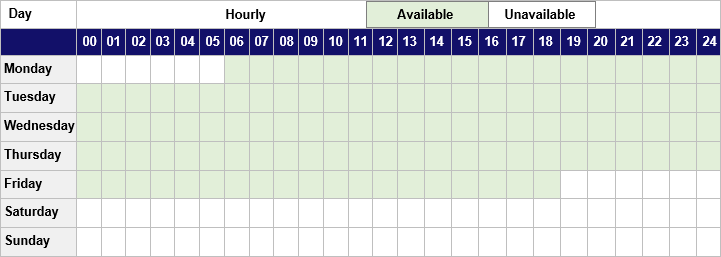
A resource’s roster. It’s only available during weekdays.
These blocks appear in the Gantt chart as non-productive tasks, interrupting the scheduled work.
-
The resource begins a scheduled task during an Available period.
-
When it reaches an Unavailable block (e.g., from 17:30 on Friday), the task is paused.
-
After the non-productive interval ends (e.g., from 06:00 on Monday) the resource resumes the task.
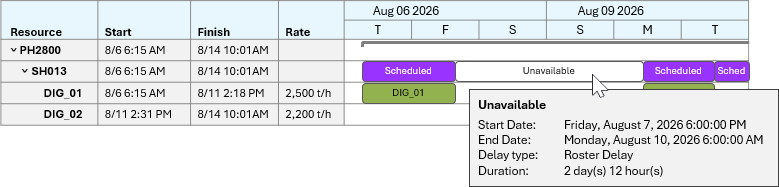
A Gantt chart, showing how a non-productive task interrupts a scheduled task. The task tooltip shows details about the break, such as the start and end time, duration, and work category name.
Roster interval
When configuring a roster, you choose the interval size, which is the granularity of each time block used to assign work categories. This determines how precisely you can define a resource’s operating schedule.
Available interval sizes:
-
Hourly
-
Half-hourly
-
15 minutes
-
5 minutes
Work category assignments are proportional across intervals. For example:
-
If you assign a work category at the hourly level (e.g. 09:00), it applies to all finer intervals within that hour – such as 09:15, 09:30, and 09:45.
-
If you assign a work category at a finer level (e.g. 5 minutes), and then view the roster at a coarser level (e.g. hourly), the block will still show the assigned category – but with a “!” icon to indicate that only part of the block is covered by that category.
Visual example
Let’s say you assign Available from 02:00 to 02:30, and Unavailable from 02:30 to 02:45. When viewed at the 15-minute level, this detail is clearly visible.

But when viewed at the hourly level, the 02:00 block will show Unavailable with a “!” icon to indicate that only part of the hour is actually unavailable.
