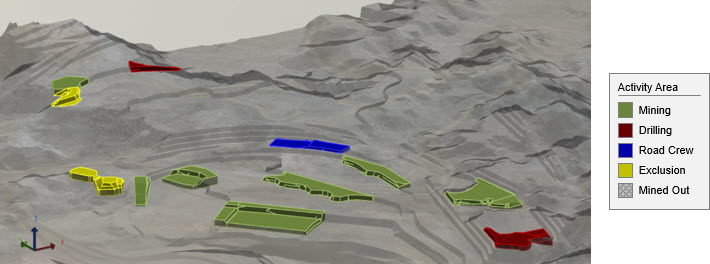
Define activities
Activities define the operations that can be scheduled in XECUTE, such as drilling, blasting, mining, and rehandling. Each activity is represented spatially by an activity area, which becomes a scheduled task during planning. These areas are linked to geological data, assigned to equipment resources, and used to build the short-term schedule.
Activities are central to short-term planning because they link:
-
Geology: Blocks and materials are grouped into activity areas.
-
Principal fields: Select fields are used to report outcomes for activity areas.
-
Tasks: Activity areas become scheduled tasks.
-
Resources: Equipment is assigned to execute the tasks.
-
Schedule: Activities determine the sequence and duration of operations.
The configuration of activity types and the creation of activity areas determine how work is sequenced, visualised, and executed across the site.
Open activities setup
In Config, go to System Configuration  > Activity Definitions
  .
.
Activity types
An activity type defines the kind of operation being performed in the schedule. These operations reflect real-world mining processes and include examples such as Mining, Drilling, and Blasting. Each activity type represents a distinct phase or function in the short-term planning workflow. An activity type’s configuration determines how the software interprets and handles the operation.
Activity types are configured to behave accordingly within XECUTE. For instance, a Mining activity type is expected to move material and may require haulage, while a Drilling activity type might involve geometry-based calculations like drill metres and spacing.
Although activity types are defined globally, they are used locally within each site and scenario. With this approach, you can maintain consistency across projects while tailoring activity behaviour to specific operational needs.
Activity areas
An activity area is a spatial polygon or volume that represents where a specific operation will occur. These areas are created in the 3D scene, either drawn manually or converted from other inputs like grade control blocks or feature layers.
Activity areas in the scene
Once created, activity areas are:
-
Sliced perpendicular to the mining direction to support detailed reserving and sequencing.
-
Reserved, meaning quantities and qualities are calculated based on the block model and material definitions.
-
Scheduled, with each area becoming a task in the Gantt chart.
Each activity area is linked to a specific activity type and inherits its configuration. When assigned to a resource, the area becomes a scheduled task, and its duration is calculated based on the quantity field and the resource’s production rate.
How to create an activity type
To define a new activity
-
Open Config > Activities.
-
Click Add.
-
Enter the Activity Definition properties.
-
Optionally, set up dependencies and material reallocation properties.
These are optional and advanced properties that can be set up later.
-
In Relevant Fields, select the principal fields that report outcomes for the activity.
-
Click Save.
Configuration concepts
Quantity field
An activity type has a quantity field, which is a principal field that helps drives the duration of a scheduled task. It represents the measurable amount of work to be completed in an activity area—such as Volume, Mass, or Hole Count—and is aggregated from the block model using predefined rules.
For example:
-
A Mining activity might use Mass as its quantity field, with tonnes calculated from volume and density.
-
A Drilling activity might use Metres, calculated from the activity area’s thickness and number of holes.
Choosing the right quantity field is essential. It must reflect the actual nature of the work being performed and use a supported aggregation type—typically Sum—so that it can be used reliably in scheduling and reporting.
Resource production rate
The production rate of a resource also plays a key role in determining task duration. It defines how quickly a piece of equipment can complete work on an activity area. For instance, if a loader has a production rate of 1,200 tonnes per hour, and the activity area contains 21,000 tonnes, the task will take approximately 17.5 hours to complete.
The combination of the activity’s quantity field and the resource’s production rate determines how long each task will run in the schedule.
For more information about resource production rates, see Define site-level resources (and about and production rates).
Examples
The table below shows how quantity fields are used across different activity types. It includes the principal field values and the fields used to derive the quantity field’s value. Note that some fields—such as Metres or No. of Holes—are only relevant to certain activity types.
|
Activity |
Activity Area |
Volume |
Density |
Average Thickness |
No of Holes |
Mass |
Metres |
Quantity Field |
Quantity to Schedule |
|---|---|---|---|---|---|---|---|---|---|
|
Mining |
DIG_01 |
54,069 |
2.36 |
5.00 |
– |
127,602.84 |
– |
Mass (Volume × Density) |
127,602.84 t |
|
Drilling |
DRL_01 |
43,683 |
2.36 |
19.5 |
129 |
103,091.88 |
2,515.5 |
Metres (AvgTk × NoHoles) |
2,515.5 m |
|
Waste |
WST_01 |
96,371 |
2.38 |
13.52 |
– |
96,371 |
– |
Volume |
96,371 m3 |
Number of slices
When you create an activity area, XECUTE divides it into slices: horizontal sections cut perpendicular to the mining direction. Slicing allows planners to calculate reserves, quantities, and other metrics at a finer level of detail, rather than treating the entire area as a single block of work.
|
An activity area |
An activity area divided into ten slices |
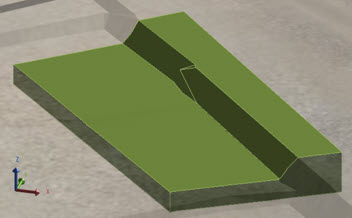
You can view activity areas in their solid or sliced form in Client > Activity Areas tab
Each slice is evaluated independently during reserving, which improves accuracy and supports more detailed reporting. For example, fields like Volume, Mass, and Average Thickness are calculated per slice and then aggregated to the activity area level.
The number of slices determines how many sections the activity area is divided into. By default, XECUTE uses 10 slices, but this can be adjusted to suit the resolution and geometry of your site.
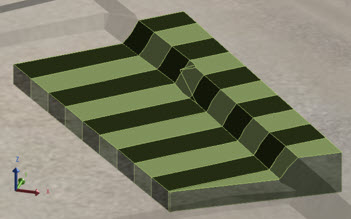
Activity areas are cut into equal width slices perpendicular to its mining direction.
An activity area sliced in its mining direction
Choose number of slices
When choosing the number of slices, consider:
-
The size of blocks in the site’s block model. Slices should be fine enough to reflect meaningful changes in geology or grade between blocks.
-
The overall thickness of the activity area. A very thin area may only need a few slices, while a thicker area may benefit from more.
-
The level of detail required for reserving, scheduling, or reporting. More slices provide finer control but may increase processing time.
Vertically mining slices
Slicing also plays a role in how activities are scheduled.
-
For activities that move material (Moves Material: Yes), slices are mined from top to bottom. When one slice is mined, the slice below it becomes available for scheduling. This helps enforce a logical vertical mining sequence.
-
For activities that don’t move material (Moves Material: No), the block beneath is only released once all slices in the current area have been processed.
Maximum resources
The Maximum Resources setting defines how many resource (pieces of equipment) can be assigned to an activity area at the same time. This limit helps control how tasks are scheduled and ensures that resource allocation reflects realistic operational constraints.
For example, if an activity area has a maximum of 2 resources, only two equipment units (e.g., loaders, drills) can work on that area concurrently in the schedule. Even if more resources are available, XECUTE will not assign more than the specified maximum.
This setting is useful for:
-
Reflecting physical or safety constraints (e.g., limited space or access).
-
Controlling task duration by limiting parallel execution.
-
Preventing overallocation of equipment to a single task.
The value should be chosen based on the expected working conditions and equipment availability for that type of operation.
[GIF] This activity area allows up to two resources to work concurrently. Initially, only one resource is assigned. When a second resource becomes available, it joins the task. With multiple resources mining together, the activity area is completed faster due to the combined production rate.
Requires haulage
The Requires Haulage setting controls whether haulage paths are generated for activity areas of the selected activity type. When enabled, XECUTE modifies the imported haulage model by adding connection roads from each activity area’s centroid to a nearby point along haulage network. These linking paths allow resources to travel between the activity area and the broader haulage network.

The Mining activity areas (green) are set to require haulage. In this case, the software automatically adds connection roads (light blue) from the centroid of the activity area to the imported haulage roads (dark blue).
During scheduling, XECUTE uses these paths to:
-
Allocate resources along realistic travel routes.
-
Calculate travel time and other haulage-related metrics.
-
Improve the accuracy of material movement timing and resource assignment.
This setting is only available when Moves Material is enabled, since haulage only applies to activities that extract and transport material.
Selectable and editable
The Selectable and Editable properties control how users interact with activity areas in the scene.
-
Selectable determines whether activity areas of a given activity type can be clicked or selected in the scene.
-
The sub-property Editable controls whether the properties of the activity area can be modified (changing defaults, mining level, name…).
These settings are useful for managing interaction once activity areas have been created. For example, you might disable selection or editing for completed areas, reference shapes, or areas that should remain fixed in the plan.
It’s generally best to leave both settings enabled during initial setup, especially while you're still refining the activity areas. Once the areas are finalised, you can disable selection or editing to lock them in place to prevent accidental changes.
These properties affect only interaction in the 3D scene: they don’t prevent the activity area from being scheduled or included in reports.
Calculation mode
The Calculation Mode setting controls when reserves are calculated for activity areas. Reserve calculation involves determining the quantities, qualities, and other principal field values for each material within an activity area. These values are based on the activity area’s shape and its spatial overlap with the block model geology.
XECUTE uses this setting to decide whether reserves are recalculated automatically as changes are made, or only when manually triggered. For example, modifying an activity area’s mining level can alter its geometry and vertical position, changing how it intersects with the block model. In such cases, recalculating reserves ensures the updated shape reflects accurate material and quantity data.
There are two modes:
-
On Change: Reserves are recalculated automatically whenever the activity area is modified. This is the default setting and is useful during active planning and refinement.
-
On Demand: Reserves are only recalculated when you explicitly trigger it using Reevaluate or Recreate. This mode is useful for improving performance when working with large or complex areas.
The selected mode applies to new activity areas created under that activity type. To change the mode for existing areas, use the Activity Area grid context menu in Client.
In general, On Change is best during setup and early planning, while On Demand is better for performance once areas are stable or when working with large datasets.
Naming convention
Activity areas need unique names so they can be identified in schedules, reports, and data feeds. XECUTE uses a pattern-based naming convention to generate these names automatically. This ensures consistency and prevents duplication across the project.
A naming pattern consists of tokens inside braces { }. The most important token is {count}, which inserts a unique sequential number for each new activity area. You can combine {count} with optional modifiers and contextual tokens to create meaningful names.
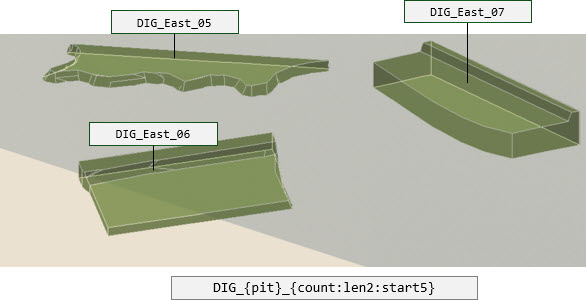

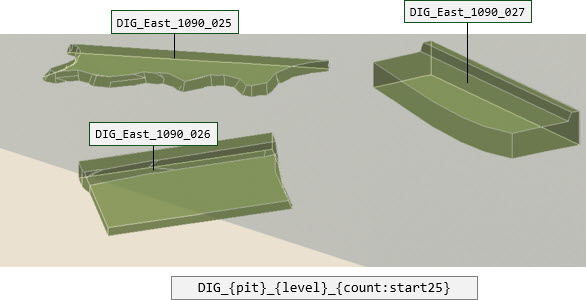
Examples of naming conventions on activity areas
Required token
-
{count} must appear in the pattern. It guarantees uniqueness.
Optional modifiers (used inside the same braces as {count}):
-
lenX sets the minimum number of digits, padding with zeros (e.g., {count:len4} → 0001).
-
startY sets the starting number (e.g., {count:start5} → begins at 5).
-
hex uses hexadecimal numbering instead of decimal.
Additional tokens
-
{pit} inserts the name of the associated pit.
-
{level} inserts the name of the associated mining level.
You can also include arbitrary text before or after tokens to make names more descriptive.
Examples
|
Pattern |
Result |
|---|---|
|
DIG_{count} |
DIG_001 |
|
DIG_{count:len5:start5} |
DIG_00005 |
|
DIG_{count:start60:hex} |
DIG_03C |
|
DIG_{pit}_{count} |
DIG_SamplePit_001 |
|
DIG_{level}.{count} |
DIG_SampleLevel.001 |
How it works
Naming conventions apply globally to all new activity areas of the same type. Changing the pattern doesn’t rename existing areas, and you can always manually rename an activity area in Client if needed.
Best practice
Keep names short but meaningful. Include {pit} or {level} when working across multiple pits or benches, and use len for consistent digit length (e.g., 001, 002).
System-defined activities
XECUTE includes a small set of system-defined activities that serve special purposes in the planning workflow. Unlike user-defined activity types, these are preconfigured with limited options and cannot be fully customised. They are designed to handle specific scenarios that occur frequently in short-term planning.
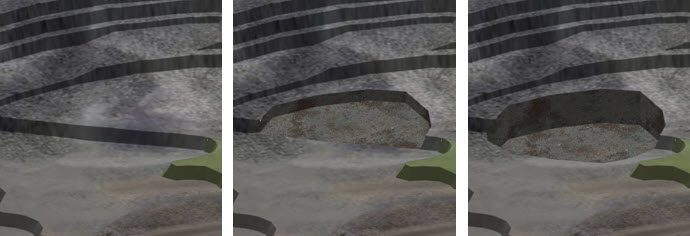
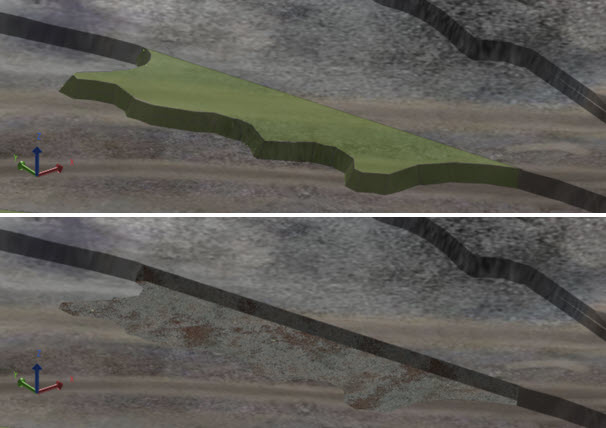
Mined-out
A mined-out activity area marks regions where all material has been extracted. Drawing a mined-out area in the Client is a quick way to update the plan and reflect the current face position without modifying the underlying block model. This ensures the schedule aligns with reality and provides an up-to-date depiction of the mine surface.
When you apply a mined-out activity:
-
The software cuts the activity area’s shape—defined by its XY extents and vertical range (from the topography down to the selected mining level)—into the topography.
-
This adjustment updates the topography so it reflects the mined-out state.
You can:
-
Create a new mined-out area to represent recently mined ground.
-
Convert an existing activity area to mined-out (for example, changing a dig area to mined-out) to maintain accurate face positions.
The images below shows a mined-out activity area and how changing the mining level modifies its vertical extents.
The images below show the result of converting an activity area to a mined-out area.
Change the mined-out style
You can change the texture and colour used on mined-out areas in Client > Topographies.
To change the mined-out style
-
Go to Client > Topographies tab.
-
On the toolbar, click Settings
 .
. -
Configure the mined-out visual settings.
-
Click OK.
-
Optionally, on the toolbar, toggle the visibility of mined-out areas
 .
.
Rehandle operations
Rehandle operations control material movements that occur outside the primary mining sequence, such as reclaiming from stockpiles.
For these operations, you can configure:
-
Colour: How the task appears in the Gantt chart.
-
Quantity field: How rehandle volumes are calculated and scheduled.
Resources can be assigned to Rehandle Groups, which define which equipment can perform rehandle tasks. If a resource is enabled for rehandle operations, its production rate uses the quantity field configured for the rehandle activity type.
For full details, refer to Rehandle groups (rehandle movements).
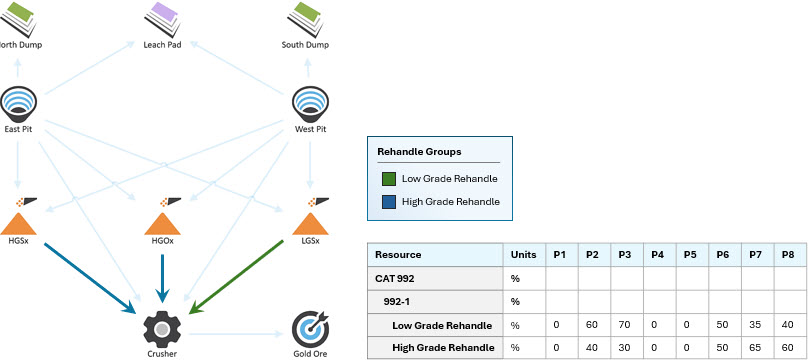
A simplified overview of preparing rehandling. You assign the Rehandle Operations activity to the required resources, define rehandle operations on the material flow diagram, and then define how much time each resource can spend on each assigned rehandle operation in a period.
Relevant fields
Each activity type in XECUTE can be configured to report specific outcomes, such as tonnes mined, grade, drill metres, or spacing. To do this, you select the principal fields that are relevant to that activity.
These fields are used to:
-
Accumulate results for each activity area created under that activity type.
-
Display outcomes in the Activity Areas tab and the 3D Scene > Materials properties panel.
You don’t need to select every available field, only those that apply to the activity’s purpose. Once you’ve selected the relevant fields, click Save to apply the configuration. You can also click Save and New to save the current item and begin defining another.
Dependencies
Dependencies are an optional, advanced feature that you can set up later.
Refer to Activity area dependencies.
In situ to scheduled (material reallocation)
Dependencies are an optional, advanced feature that you can set up later.
Refer to Material reallocation.