You can create a position table for levels in your database to map each record name to a unique number within that level (called the position number or Absolute Position in Level Number (APIL)). You can use position tables to simplify XCM logic and to ensure records are displayed in a logical order in the structure tree. For example, the most logical way to order records in a database where level 3 is defined as is in stratigraphic order (from top to bottom).
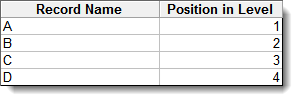
Assume the seam names (in stratigraphic order) are , , , and . Without a position table, seam records could end up in any order in the database and in any position number within that level. Creating an XCM would become more complex than necessary, and the structure tree unclear. To prevent this, you can set up a level position table to control which position number each seam record is placed in, for example:


|
The 'Position in Level' number does not need to start at '1', and do not need to be consecutive. In some cases it may be beneficial to leave position numbers vacant at the start of the list. For example, if there is a chance that a group of seams (stratigraphically above the listed seams) may be included in your database at a later stage, then it would be advisable to make the first position number (for example). You could then add up to 20 seams to the database at a later stage with minimal disruption to any XCMs that reference the seam.
Similarly, if you may split some seams in reserves that will be added to the database at a later stage, then it would be advisable to increment the position numbers, for example, by five. You could then add up to four extra seams between the existing seams.
These issues and the use of position in level numbers in XCMs should all be considered when setting up position tables.
|
A position table is a means of ensuring that records with the same name for a particular level are always located in the same position within the level. For example, you can set up a table which states that seam should always appear in the first position, seam in the second position, seam in the third position, and so on.
To create a position table for a database level:
| 1. | Select the check box for the database level that you want to create a position table for. The button becomes available: |

| 2. | Click . The window displays (where is the name of the level that you are creating a position table for). |
| 3. | Click . The window displays. |
| 4. | For each entry that you want to add: |
| b. | If required, change the automatically assigned value. |
| c. | Click . XPAC adds the entry to the list of entries. |
| 5. | Click . The window redisplays. |

|
If required, you can edit or delete entries by selecting it and either typing new data or pressing . If you try to assign a position number that is already being used, an error message displays when you click .
|
XPAC saves the position table for the specified database level.

|
If you add a position table to a level that already contains records in the database structure, XPAC displays a message that it needs to scan the database to update records attributes. Click . If any records do not match the new position table, XPAC changes the Position in Level (PIL) number of the record to ensure that it does match. However, if a record name for a does not exist in the position table, XPAC asks you to add the record name to the position table.
|
To deactivate a position table:
| 1. | Deselect the check box for the level that you want to deactivate. A confirmation message displays. |
XPAC deactivates the position table. You can reactivate it by selecting the check box again.
Importing and exporting levels and position tables
You can reuse database level and position table data between XPAC projects by transferring data.
To export database level and position table data to a file:
| 1. | Click . A Windows Explorer window displays. |
| 2. | Navigate to the folder in which you want to save your exported file. |
| 3. | Type a name for the file. |
XPAC saves the data as an XPAC Template File (TPL).
To import database level and position table data from a TPL file:
| 1. | Click . A confirmation message displays. |
| 2. | Click . A Windows Explorer window displays. |
| 3. | Navigate to the folder containing the TPL file that you want to import. |
| 4. | Select the file and click . |
XPAC imports the database level and position table data into the project.


