A Dump Path is made up of a list of records that define a dumping sequence. A record can be added to a Dump Path as follows:
| • | Click on Dump Paths in the schedule setup tree for any scenario. |
| • | Click on the Dump Path that you want to edit in the right hand pane of the window and then click on the button to the right of the list. The Dump Path that you selected will be displayed. |
| • | Right click on the line in the Dump Path where you wish to add or insert a dump record. If there are no records in the Dump Path, then click on the line containing the asterisk. Select from the right click menu. |
| • | The Insert Block window will be displayed. Only the Dump records are displayed in the tree on the left side of this window. The button at the top left of the window can be used to display specific Dump records. To view the required Dump record(s), expand and collapse the tree by clicking on the plus or minus sign to the left of the record name. |
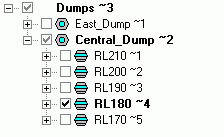
| • | To select a record from the tree, click on the empty box to the left of the record name and a tick will appear. Lowest level or upper level records can be selected. If an upper level record is selected, then all of its lowest level records will be selected. In the following window, the upper level record RL180 in the Central Dump has been selected.
 |
| • | The selected records will be placed in the list on the right hand pane of the Insert Block window. Records can be removed from this list by highlighting them and selecting from the right click menu. |
| • | In addition to selecting Dump records, you must also specify the for each record. This is the percentage by which the Dump record can be filled. It must be between 0% and 100% and should be entered as a decimal. By default it will be set to 100%. This percentage could be less than 100% if there was already some material dumped in the record or if you only wanted to fill a portion of the record at this point in time. |
| • | When you are happy with the records in this list and with their order, click to place the records into the Dump Path. |
| • | Note that the columns that are displayed in a dump path can be modified and the settings will be saved for that particular dump path. To modify the columns, point anywhere on the dump path and select from the right click menu. The Scheduling Path Field Selection window will be displayed. |


