Create a resource |

|

|
|
Create a resource |

|

|
A new resource can be created in a number of ways.
| • | From the Scenarios tab: Open the schedule setup tree for any scenario and right click Resource in the tree. Select Insert Resource and you will be moved to the All Items tab. |
| • | From the Scenarios tab: Open the schedule setup tree for any scenario and right click on any Resource Name in the tree. Select Insert Resource and you will be moved to the All Items tab. |
| • | From the All Items tab: Go to the All Items tab on the left of the schedule setup window. From this tab, select Resources in the tree structure to display the current list of resources on the right of the window. Click New (on the far right). |
You should now type a unique name for the resource. It may be up to 50 characters in length and it may include alphanumeric characters, spaces and dashes (-).
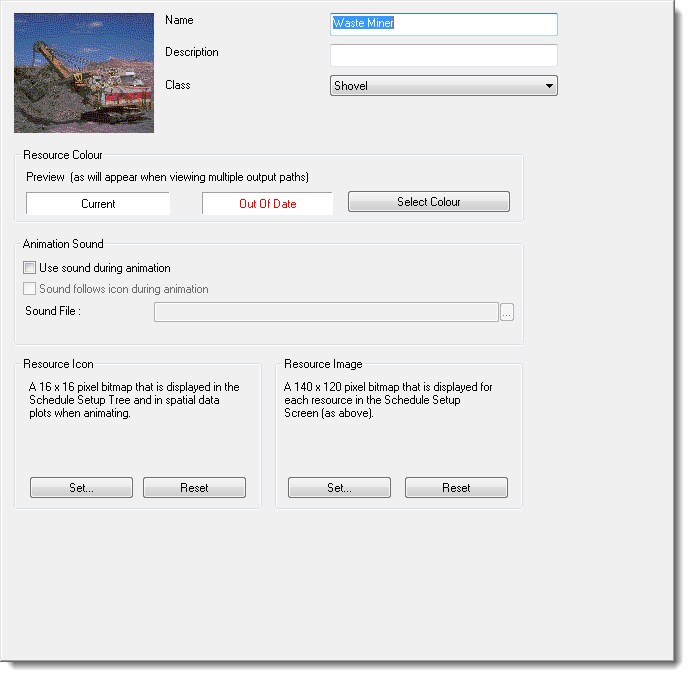
Information will be displayed on the right of the window relating to the new resource, as shown below. Note that this data cannot be varied for different schedule scenarios.

The Name is the resource template name that you have provided.
The Description is a longer explanation of what the resource represents. It might include the bucket size, equipment number, fleet description, target details, etc.
The resource Class can be set to a range of open cut and underground equipment types. Use Class to define the default picture displayed on the top right of the resource window and the default symbol displayed to the left of the resource name in the tree structure. Select the Class from the drop down list.
The Resource Colour is used in the Joint Path View and the Combined Output Path View. In these windows, the output paths for multiple resources can be displayed. To visually distinguish which resource has scheduled each step, the step is coloured using the resource colour set in this field.
To change the resource colour click Select Colour. An example of the step display is provided to assist in your colour selection.
The Animation Sound options are used when the resource is included in an animated spatial data plot of the schedule results.
If this box is deselected, there will be no sound when this resource is included in an animation. If the box is selected, the sound file selected in the box below will be audible when the resource is included in an animation.
If this box is deselected, the sound for the resource will come evenly out of both speakers. If this box is selected, the sound will follow the resource around the screen. For example, if the resource displays to the left of the screen, the sound will be louder from the left speaker.
The sound file to use for the resource is selected from the box on the bottom of the window. Click Browse button to select a file. A range of sound waves are provided in the wav directory in your XPAC installation area.
The resource icon is used to represent the resource in the schedule setup tree and in spatial data plots during animations. If you have a 16x16 pixel bitmap available to represent your resource, it can be used for the resource icon. Click Set to browse for the bitmap file.
The Resource Class is used to determine the default bitmap that will be used for the resource icon. The resource icon can be set back to the default at any time by clicking on Reset.
The resource image is displayed on the resource window in schedule setup (on both the All Items and the Scenarios tabs). If you have a 140x120 pixel bitmap available to represent your resource, it can be used for the resource image. Click Set to browse for the bitmap file.
The Resource Class is used to determine the default bitmap that will be used for the resource image. The resource image can be set back to the default at any time by clicking on Reset.