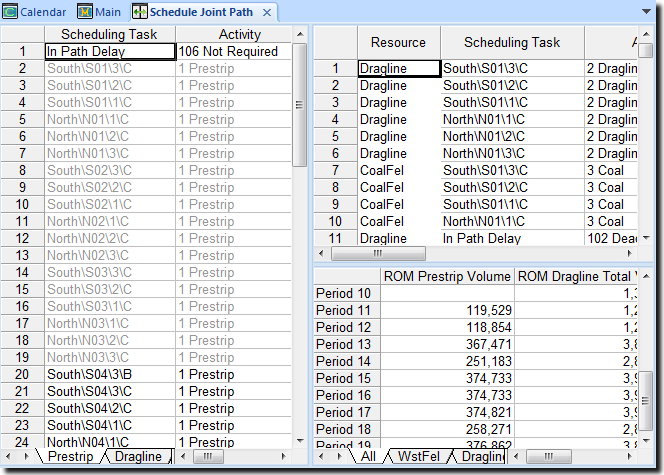
You can access the from the menu, under , or by clicking the button on the toolbar. The Joint path view is quite useful when fine-tuning stockpile movements, as it synchronises the output path step with the input path step, so you can confirm the requested material was scheduled.
The is made up of multiple schedule results. It contains an Input Path on the left pane of the tab, the corresponding Output Path on the upper right pane of the window and multiple Period Totals on the lower right of the tab.

Settings
When you are in the , you can make use of the toolbar. The toolbar contains one button: . Use this button to control the scenario and resources that XPAC displays in the tab. If the toolbar does not display, activate it at .
When you click , XPAC will display the following options in a menu:
| • | - This option displays a list of all of the scenarios in your project. The active scenario will be followed by an asterisk (*). The current scenario that is selected will have a tick next to its name. |
| • | - This option displays a list of all of the resources in the selected scenario. In addition there will be an item called and an item called on the menu. You can display schedule results for: |
| ▪ | a single resource by selecting its name from this menu; |
| ▪ | multiple resources in the scenario by selecting from the menu. You must then highlight the required resources in the window that follows (use the standard and commands to highlight multiple resources); or |
| ▪ | all resources in the scenario by selecting from the menu. The resources that are currently selected will have a tick next to their name. |
| • | - This option will take you to the window. |
| • | - This option will display a window containing information about the contents of the . |
Input Path
Only one resource can be displayed at a time in the Input Path pane. The resource to display is selected from the tabs at the bottom of the pane. The following options are available from the right click menu for the Input Paths.
| • | The columns to display in the Input Path can be edited for by selecting . All resources displayed use the same format. |
| • | The option is used to highlight steps in both the Input and Output Paths. It can be toggled on and off. When this option is on and you click on a step in an Input Path, that corresponding step is highlighted in the Output Path (where it may consist of multiple steps). |
| • | The option is used to locate a single step in the Output Path. When you select this option, the Input Path step currently selected will be highlighted in the Output Path. |
Output Path
The Output Path window will display the steps for all of the resources selected on the Settings button. The steps will be sorted according to their start date. If multiple resources are displayed, you will need to identify which resource each step belongs to. This can be done as follows:
| • | Edit the Path Fields for the Output Path and display the resource name. |
From the right click menu in the Output Path, there is an option called . This option allows you to transfer a combined Output Path (for multiple resources) to a Preschedule Table or an Input Path. The path can be limited to a particular activity and you also have the option to exclude delays.
Period Totals
There are three separate panes on the bottom right of the Joint Path View that are used for displaying Period Totals. Any of these panes can be hidden by moving the relevant pane divider. If the period results are displayed in red at any time, they can be updated by pressing . The three period total panes are as follows:
| • | - the totals can be displayed for each resource or for all resources by clicking on the relevant resource tab at the bottom of this pane. From the right click menu on this window pane, the resource results can be plotted using and different fields can be displayed using . |
| • | - the stockpile movements in and out for each period are summarised in this window pane. For each stockpile in the selected scenario and for each period, the quantity moved onto the stockpile, the quantity moved from the stockpile and the end of period inventory are reported. From the right click menu on this window pane, different fields can be displayed using the option. |
| • | - the dump movements in and out for each period are summarised in this window pane. At this stage it is not possible to schedule material a dump, so the movements out will always be zero. For each dump in the selected scenario and for each period, the quantity moved into the dump, the quantity moved from the dump (zero) and the end of period inventory are reported. From the right click menu on this window pane, different fields can be displayed using the option. |
Run the Schedule
A schedule can be run for the current from the Joint Path View by clicking on the button.


