You can define productive activities for your project, then assign them to various data fields in the main database.

|
You do not need to use all productive activities that you defined for your project in a particular scenario.
|
In the tab under the relevant scenario in the tree structure, click on . Data for the productive activities display in the right pane, for example:

All productive activities that are defined in your project are listed in the table.

|
If you change the productive activity data in this screen, you are changing it for scenarios in the current project.
|
Active Activities
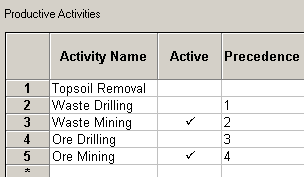
When you first create a scenario, all of the productive activities will be set as for that scenario (ie. there will not be any ticks in the column). Any of the productive activities can be set to by clicking in the column for that activity. A tick will be displayed to show that it is Active. Any number of activities can be active for a scenario. In the window above the Waste Mining and the Ore Mining activities have been made Active and all of the other activities are Inactive.
Implied Precedences
If an activity is set to be inactive in a scenario, then the implied precedences may need to be utilised. This is best explained using an example. Consider the following productive activities that have been defined for a scenario.

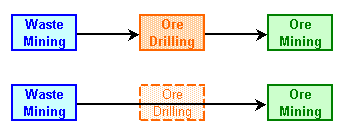
Precedences have been defined for these activities, however they are not all active. Waste Mining is a precedence for Ore Drilling and Ore Drilling is a precedence for Ore Mining, however Ore Drilling in Inactive. The Implied precedences are used such that Waste Mining becomes a precedence for Ore Mining in this case. This is illustrated in the following flow chart.

Creating activity groups
You can create activity groups to identify and report on multiple activities that occur in the same area.
To create an activity group:
| a. | Click the tab if you want to create an activity group for all scenarios; or |
| b. | Click the to create an activity group for a specific scenario. |
| 4. | In the section, click . |
| 5. | Type a name for the group, for example, . |
| 7. | Click in the column for each activity that you want to add to the group. A tick displays against each selected activity. |
| 8. | Select an value for each activity in the group. The values are populated with the Database Accumulation Fields associated with the selected activities. |
| 9. | Select the that you want to use for the activity group. Activities that you marked as display in this list. |
| 10. | Specify the . The mining directions are used in Period Progress plots to determine the shaded area for partially mined activity groups. |
You can now activate the activity group in a Mine Progress or Mine Status plot (by selecting tab).


