Working with analysis report dimensions |

|

|
|
Working with analysis report dimensions |

|

|
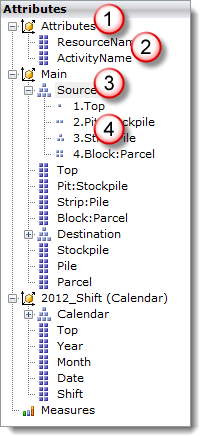
In the Attributes pane, attributes are grouped together into dimensions. In the database report example below, you can see three different dimensions, with the first three expanded to display their component attributes.

Key |
Icon |
Component |
Description |
|---|---|---|---|
|
|
Dimension |
See Dimensions for more information. |
|
|
Attribute |
See Working with analysis report attributes for more information. |
|
|
Hierarchy |
See Hierarchies and levels for more information. |
|
|
Level |
See Hierarchies and levels for more information. |
You can add a new dimension by right-clicking below the list of attributes on the Attributes pane and selecting Add Dimension. If there is not enough room, you may need to increase the size of the pane by clicking and dragging the bottom edge.
The Add Dimension dialog box lets you set the:
| • | Name: this field does not display in the analysis report. The purpose of this field is to record the origin of the source data. As a result, it has more meaning for dimensions that were created with the report than user-added dimensions. |
| • | Caption: use this field to record the display name for the dimension in the Attributes pane. |
Related topicsWorking with analysis report attributes for information on how to add an attribute to a dimension. Working with analysis report expressions for information on building attributes. |
You can delete a dimension from the Attributes list by right-clicking it and selecting Delete Dimension.
However, you can only delete a dimension, hierarchy or level that you create within analysis reports. You cannot delete dimensions, hierarchies or levels that were created by analysis reports when creating the report.
In the example above, the Main and Calendar dimensions contain attributes arranged in hierarchies, Source and Calendar respectively. Note how the hierarchy icons differ from the attribute icons. Each hierarchy contains one or more levels, arranged in order under the hierarchy.
You cannot drag & drop levels onto cards. The hierarchies control how you drill up and down through attribute data.
You can add a hierarchy to any existing dimension by right-clicking the dimension heading and selecting Add Hierarchy. The Add Hierarchy dialog box lets you set the:
| • | Name: this field does not display in the analysis report. The purpose of this field is to record the origin of the source data. As a result, it has more meaning for hierarchies that were created with the report than user-added hierarchies. |
| • | Caption: use this field to record the display name for the hierarchy in the Attributes pane. |
| • | Display folder: use this field if you want to assign a separate display folder for the hierarchy. You can leave this field blank. |
| • | Levels: select the level you want to move in the hierarchy and use the arrow buttons to the left to move that level up or down in the hierarchy. Use the double arrows to move the level all the way to the top or bottom. |
You can add a level to a hierarchy by right-clicking the hierarchy caption (in the example above, the caption for the Main database's hierarchy is Source), then selecting Add Level.
You can edit a level in a hierarchy by right-clicking that level, then selecting Edit Level.
To edit where a level sits in a hierarchy, you need to edit the hierarchy.
Use the expression builder to create a new level or edit an existing level.
You can delete a level from the Attributes list by right-clicking it and selecting Delete Level.
However, you can only delete a level that you create within analysis reports. You cannot delete levels that were created by analysis reports when creating the report.
You can delete a hierarchy from the Attributes list by right-clicking it and selecting Delete Hierarchy.
However, you can only delete a hierarchy or level that you create within analysis reports. You cannot delete hierarchies or levels that were created by analysis reports when creating the report.