Data import Fixed Width File field setup |

|

|
|
Data import Fixed Width File field setup |

|

|
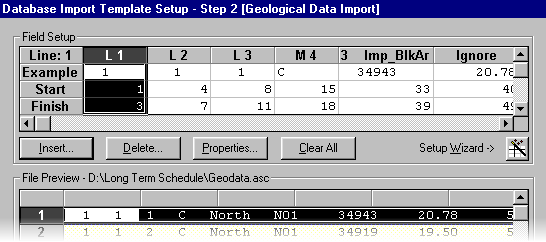
If the file type has been set to fixed width, then the second window of the Database Import Template is where the field setup is defined:

This window is where you define the column and row numbers in which the data is stored and the place in XPAC where this data is to be written. The top portion of the window contains the Field Setup box and the lower portion of the window contains a File Preview of the import file.
When you first come to this window, XPAC will have guessed the column numbers in which the data is stored. In many cases this will be correct, however if it is not correct, you can change the column numbers as required.
Each field that is to be read from the import file is represented by a column in the Field Setup box. The line number from which the field is being read, is specified on the top left of the Field Setup box. The line number can be altered by clicking on a different line in the File Preview.
In the example window above, the first field (in the highlighted column) is defined as follows:
| • | On the first line, the destination of the data in XPAC is defined. In this example it is L1, where L signifies a level position number and the '1' signifies level number one. Other options include a level name (M), a data field (number and code) or Ignore. |
| • | On the second line, an example of the data from the file is displayed, according to the start and finish columns specified below. In the screen above, the number one is displayed indicating the first data item is position in level 1 for level 1. |
| • | On the third line, the column number in which to start reading data from the file, is specified. |
| • | On the fourth line, the column number after which to finish reading data from the file, is specified. |
The destination and the start and finish column numbers can be changed for any field by editing the field properties.
Fields can be added to and removed from the Field Setup box. To add a field, click the Insert button and the field properties window will be displayed. To delete a field, highlight the field's column, then click the Delete button.
If you want to edit the properties for a field in the template, this can be done by highlighting the field's column and then clicking the Properties button. The field properties window is then displayed.
If you want to remove all fields from the Field Setup box, then click the Clear All button.
A setup wizard has been provided to assist you in setting up the fields to import. The wizard is useful if you are setting up a new template from scratch. To start the wizard, click the button.
Use the File Preview box to display a sample of the import file. The lines of data for one record have a white background and the lines of data for the next record have a yellow background, and so on. The number of lines of data for each record is specified on the first window of the Data Import Template, in the field Number of lines per item.
Each of the lines read for a record may have a different data format and will contain different data, therefore each line must have a separate Field Setup. To select the line for field setup, click the relevant line in the File Preview box. The Field Setup box will change to display the fields setup for the selected line. Fields can then be inserted, deleted or edited for the selected line. The line number that you have highlighted is displayed on the top left of the Field Setup box.
The current template can be saved or an existing template can be loaded from the field setup window.
If you need to return to the file type window in the Database Import Template, the Back button can be used.
When you have completed the Field Setup, click the Finish button to proceed with the Data Import.